Dell Boomi is the no. 1 coordination cloud that helps in building integrations whenever, anywhere without the utilization of coding. It gives you a chance to integrate on-premise applications in a more brilliant and quicker manner. Here, are the steps that can help you integrate Salesforce with your ERP using Dell Boomi.
Integration of Salesforce with ERP using Dell Boomi happens in two steps –
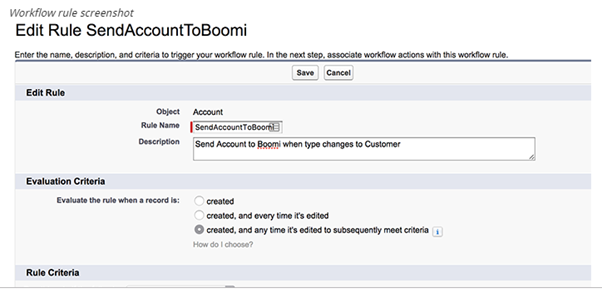
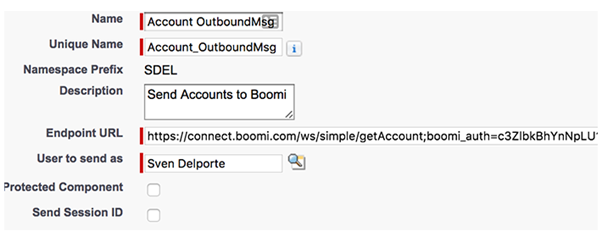
Step 1. Setting up Salesforce Outbound Message
- In Salesforce you can set up a workflow rule that conveys an outbound message dependent on a specific activity.
- PutsReq is an incredible site for testing out HTTP requests. It catches the header and displays the raw body of the message. You can utilize it to catch the XML output which will later be utilized in our Dell Boomi XML profile.
- At that point catch the XML output and paste it in a content document so you can utilize it later in our Dell Boomi XML profile setup. At the point when the outbound message is set up, you can go to the Boomi side to set up the integration flow.
Step 2. Dell Boomi – Build integration process
- In Boomi, you need to set up a web server listener which you receive with the Professional plus license or with the Professional license +. The Services Enablement add-on which is a key element if you need to set-up a listener process. It allows you to generate a public endpoint that you can utilize in your integration flows.
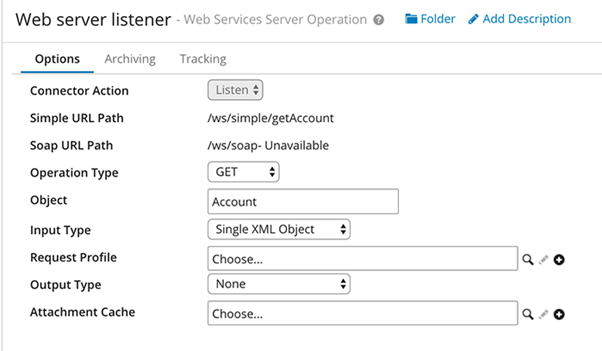
- When you want to generate a process in Boomi, it will ask you what you need to use as Start shape. For this, you need to choose the web services server. You can then generate a process for it where you can define what actually needs to occur. This is where the previously saved XML file from putsreq.com can be brought into use.
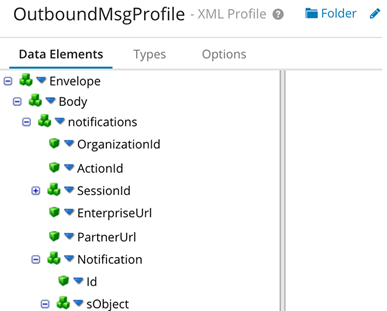
- You need to click on the ‘+’ sign on theRequest Profile to create a new XML profile from our previously saved XML file through Putsreq.com. By clicking the import button on the top right corner, you can easily upload a complete XML schema. The XML profile will be auto-generated and you will receive an output profile. After saving it you need to create a response profile as the Outbound Message also requires an acknowledgment else it will remain in the Salesforce Queue for 24 hours.
- The queued message will be re-sent on unvarying breaks until the server answers, or it will be let go of if the 24 hours have passed.
- You can also start by adding some target connectors so that you can easily import the existing target structure and you don’t need to create it manually.
- After this, you need to use FTP connector where you can output a CSV file with the Account data in it.
- Once the target connector FTP is configured, you need to map the Salesforce message and the csv output. This can be done easily by dragging the map shape onto the canvas. For this, you need to have an empty map shape where you can select the source profile and target profile.
- As a source profile, you can easily click on Choose and then navigate to the OutboundMsg XML profile that was generated earlier. As a target profile, you need to create a new flat file profile if you haven’t done this before. On the CSV profile, you can easily import a template CSV to get the profile you need.
- From now on it is simply a matter of dragging one line from the left side field to the right side field to generate the charting between the 2 systems.
- Now you just need to connect the shapes and add an extra process property to give the CSV file a name. The process property step lets you give your file a correct name beside the proper extension. You can also add variables such as the date and time but you can similarly use static text.
- Once the process is built, it is ready to deploy to an Atom. A single Atom in Boomi is a single tenant, solitary node AtomSphere engine that can also run in the cloud and also on premise. You can utilize Windows/Linux and – now also since the newest release – Docker too which is a great addition and very easy to use.
- Once you have deployed the process you need to configure the Endpoint URL for the web server. This can be set in the shared web server settings of the atom which is also the place where you can configure the security options
- You need to use the basic authentication with a username and a token. Which you need to convert in a base64 string to use in the URL. The username and password need to be set as username: token and be converted to a base64 string using an online encoder like base64encode.org. If you utilize a local atom you can define the URL ourselves.
- From the FTP server, the file could be processed by the ERP system, or just as easily you could have connected directly to our ERPs API with one of the many application connectors provided in Dell Boomi.
Conclusion
Using an integration platform, you can really speed up the build of your integration processes. Everything is visible in one place and you don’t need to be a developer to monitor, debug, and/or adapt the integration flows. If you do not have the required developers in your company that can uphold the integration flows then a middleware tool like Dell Boomi can actually help you in attaining your integration goals.
Ready to accelerate your Salesforce journey?
Talk to a JanBask specialist and get a strategy session tailored to your business.