Salesforce is lacking in document management capabilities and this is the reason why Salesforce users had to use third-party apps as document management solutions. Salesforce integration with Share Point that helps to manage documents securely and makes all the files available in a single platform. SharePoint and Salesforce integration is the logical step for every organization and most waited activity too that has been requested by the users a plenty of times.
Here is a list of the points to integrate Salesforce with Sharepoint in brief-
- Go to Developer Account > Setup > Quickfind
- Type Files Connect
- Edit to change the settings
- Files Connect and customize it
- Set user access permission to File Connect by going to Permission for sets
- Go to Quickfind box again and type Auth
- Select Auth Providers
- Note down the site collection path of the site you want to connect
- You have created a small app
- Access the URL
- Form and add the application ID created earlier opens up
- Define the level of access here
- Lastly create an external data source and set the permission for the same.
Now, we will discuss in detail, how you can connect Salesforce and SharePoint together through File connect online? Let us have a quick discussion on File Connect and why it is useful Salesforce integration?
A Quick Introduction To File Connect
When Salesforce is integrated with some document management software then it helps to make the business process faster and easier. This is the reason why Companies need an easy integration method where they can complete the process within minutes only.
With File Connect, this is possible to access files through some external locations and utilize the same as standard SDFC objects. File Connect also offers cloud capabilities in the professional edition or above. So, if you wanted to get maximum benefits of File Connect utility then you need to pay a little cost or opt for the paid Salesforce editions.
How to integrate Salesforce with SharePoint?
Step 1
Login to your Salesforce account and type the File connect in the Quick Find box
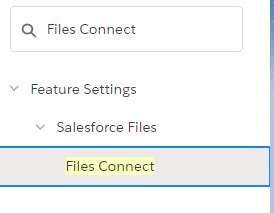
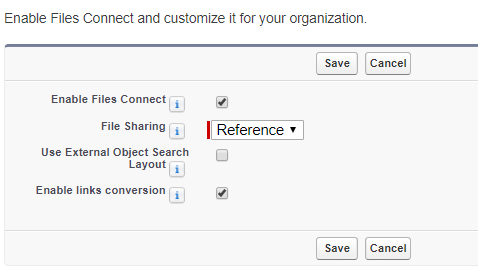
Now click on File connect option as highlighted in yellow and click on Edit to change the settings.
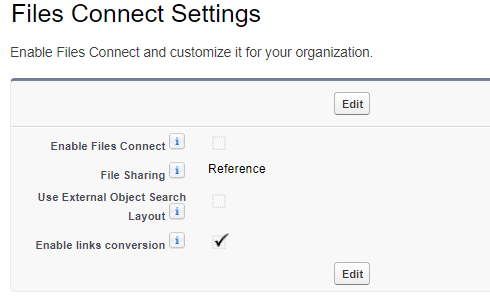
As soon as you will click on Edit option as shown in the screenshot, enable Files Connect and customize it based on your Company needs then click on Save button given in the end to make the changes active.
Step 2
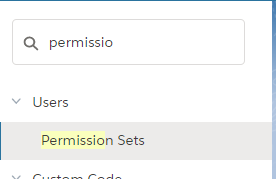
Now set the user access permission sets for File connect. For this purpose, you again need to type the ‘Permission Set’ in the Quick Find box and select the same option to set the permission for users and Files Connect.
As soon as you click on the option, you can see the following Window on your right-hand side and make changes accordingly.
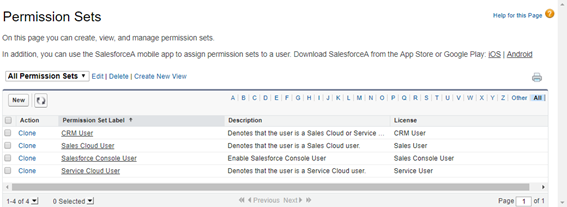
To change the permission set, your license should be authentic and higher than professional ones. For SharePoint 2000 or 2013, Choose ‘on-premise File connect’ option. Now check the users who had the same permission sets in ‘Manage Assignment’ option. Here, you have to make sure that all users that need to access these files must be configured over here.
Another important fact that is usually skipped by Salesforce professionals is to check Files Connect cloud permission settings in the profile section. In the Profile section too, add the users that need permission to access this tool.
Step 3
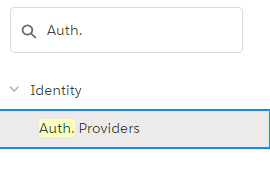
Once you are done with the permission sets, go to the quick find bar again and type Auth. Providers then click on New and choose the ‘Provide Type’ in the professional edition or above.
As we are connecting Share Point here, so provider type would be Microsoft access control services. Now follow the instruction step by step as shown in the screenshot to get your job done.

Step 4
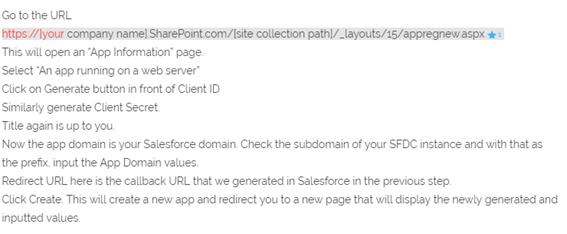
Now, this is time for SharePoint Configuration. Go to the site collection that you want to connect and note down the site collection path as it would be used later. Here, for this step, our objective is to configure a small Microsoft 365 app. You need to follow each step in the given sequence as shown below in the screenshot –
Step 5
With the above-given steps, you have created a small app successfully. Now, this is the right time to configure that particular app. Go to the given URL first –
![]()
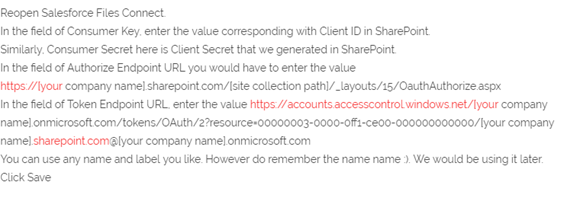
As soon, you access the given URL, it will open a new Form and add the application ID here that you have generated earlier in step 4. So, paste the value here and choose Lookup option. It will pop up the permission sets box. You need to define the level of access here and standard input should be given in the format –
![]()
Step 6
At the last step, File Connect will be configured again. Be 100 percent precise and mindful here for a successful Salesforce integration otherwise all the efforts could be wasted.
Step 7
Now create an external data source and set the permission for the same. Now you can see the SharePoint in external tabs and start using it as per your convenience.
This is a very straightforward integration method and it needs to be followed step by step for assured outcomes. The same technique can be used to connect other products like Google Drive, One Drive, Google apps etc. So, we wish you all the best for your successful Salesforce integrations. And don’t forget to share your experience with us once you have done your job as discussed.
Ready to accelerate your Salesforce journey?
Talk to a JanBask specialist and get a strategy session tailored to your business.