
6007

To enable Salesforce integration with Google Analytics, you must have the Edit Permissions first. In this article, we have given the process with code samples for your reference. The topics covered in this post include –
There are two options for user identification in analytics either Client ID or User ID. To facilitate the data import in Salesforce cloud, you should implement the Client ID first and you had the option to implement User ID too.
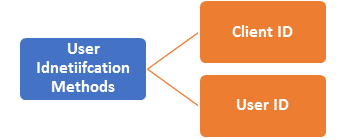
With Client ID, you could identify the browser instance anonymously. This is the cookie-based, non-authenticated identifier generated by the analytics enabled site automatically when the user visits a site for the first time. Hence, a Client ID is created and this is the most suitable technique for business to retain the existing customers and getting new leads.
If any business has a high rate of logged-in users then it needs a USER ID that will analyze a group of the session with a unique identifiable ID. If you wanted to set up the user ID then it needs extra work and code on your site.
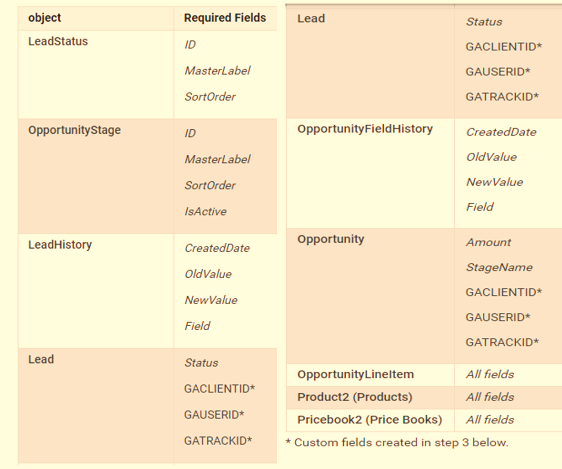
To set up the Salesforce integration with Google Analytics, you must have the full access to the given Salesforce objects and fields. If any user has administrative access then he could access these objects and fields quickly. To allow the access, you need to define the permission set properly for the user who is interested in connecting Salesforce or analytics accounts together. A user with limited access is not allowed to work with all fields or objects as given above.
To store the analytics tracking code in Salesforce, let us create the three fields first. The name for the fields could be given as below.
| Field Name | API Name | Field Length |
| JTCLIENTID | JTCLIENTID_C | 255 |
| JTUSERID | JTUSERID_C | 255 |
| JTTRACKID | JTTRACKID_C | 255 |
For the Lead object, you should enable the History Tracking Field. In the case of the Opportunity object, enable the History Tracking feature for the Stage field. This will make sure that any changes to these fields will lead a HIT event.
Map the fields in one object to another one as given below –
To capture or store the needed tracking information, we will modify the lead form in this step. For this purpose, you should know about your analytics tracking ID. You must be wondering why we need tracking ID here?
With the help of tracking ID, you can always distinguish how to import the data from multiple lead forms from different sites tracked with multiple analytical accounts, this can be made possible by user/client ID only.
In the first step, let us learn how to add the custom fields in the lead form using JS programming language. Here is code sample for your reference –
<form action=”” name=”myForm”>
Phone: <input type=”text” name=”phone_number”>
<input type=”hidden” id=”JTCLIENTID” name=”JTCLIENTID” value=””>
<input type=”hidden” id=”JTUSERID” name=”JTUSERID” value=””>
<input type=”hidden” id=”JTTRACKID” name=”JTTRACKID” value=”UA-XXXXX-YY”>
<input type=”submit”>
</form>
With this sample code, you can add both user id and client id to your lead form. In case, you wanted to add client ID only then you could remove the JTUSERID option here. To set the ID statistically, replace the “UA-XXXXX-YY” with your Track ID. Here, in the next step, let us learn how to set the ID dynamically.
<script type=”text/javascript”>
ga(function() {
var tracker = ga.getAll()[0];
var trackingId = tracker.get(‘trackingId’);
});
</script>
Once you have added the custom fields and track ID, let us see how to set the custom tracking field values? You just need to add the code given below to populate the user ID or the client ID.
<script type=”text/javascript”>
document.getElementById(‘FORM_ID’).addEventListener(
‘submit’, function(event) {
ga(function() {
var tracker = ga.getAll()[0];
var clientId = tracker.get(‘clientId’);
document.getElementById(‘GACLIENTID’).value = clientId;
var userId = tracker.get(‘userId’);
document.getElementById(‘GAUSERID’).value = userId;
});
});
</script>
Here, you will add the google analytics with your Salesforce cloud account by allowing the authorized access to the account. For this purpose, you will need to create a Salesforce Sales Cloud data set. Here are the steps to follow –
If you wanted to import data from multiple accounts then repeat the same process by creating multiple Salesforce credentials.
With this option, you can set up or map the configured Salesforce fields to corresponding Analytics Track IDs. If you wanted to use custom fields here then make sure that they are configured well across both Lead and Opportunity objects. Once tracking fields are configured well, click on Continue in the end.
Here, you will select the Salesforce Lead or Opportunity milestones to import. Practically, you will realize how often milestones are imported. From the data source details panel, select the milestones that you wanted to import. And Click on continue in the end.
You can also import user attributes or product data too from your Salesforce account. Although this is optional but recommended for most of the integrations. It helps you to derive more audiences and generating new leads with the proper analytics.
In this step, you will check or test the set up by importing some data to your Salesforce account and view the same in the analytics report. Follow the same steps as discussed earlier for the data import, now locate the data sets, manage uploads, and fetch the data. In this way, you can upload data to your Salesforce account and once the upload is successful it will show the status as completed. If the upload is not complete then it will show a Failure message.
Imported data may take 26 hours before it is available in the reporting. Further, you should check the imported user attributes and product data too. Once you are sure on all parameters, the integration is successful and it can be used or your project now.
Makes sure that the integration process is limited to the Privacy Policy and the Analytics Terms of Services. Don’t import any personal details. If you wanted to use the multi-currency option then you should configure your Salesforce account accordingly otherwise it can be utilized for single currency only. Empty fields are removed from the measurement protocol once the data is imported successfully.
The size of data should not exceed more than 8192 bytes. Don’t use commas in the imported because they are taken as separators. Further, the limit for enhanced e-commerce is set to maximum 200 unique product indexes.
With this discussion, you have a complete idea of Salesforce integration with google analytics in a few simple steps. Just follow the instructions as given and you would be able to import data from analytics to Salesforce account whenever needed.
Stop, read and acquire deep insights into complex issues
© 2026 Copyright - JanBask.com | Designed by - JanBask Digital Design
Get Free Experts Consultation
Let's Connect


Write a Comment