Web-to-lead is the main lead generation tool in Salesforce. It simply enables a route for you to create a Lead record in Salesforce on your site. You’ve may have seen the idea before on sites wherein you fill in some fast data, for example, First Name, Last Name, Company Name, and Email Address and “Submit.” Maybe this data was required to download a white paper or to make a “contact me” request. The utilization cases are numerous, yet the idea is the same. Collecting contact information and submitting it to Salesforce to create a lead record.
Steps to Create a Salesforce Web-to-lead form
Here are the steps you can use to create a Web-to-lead form-
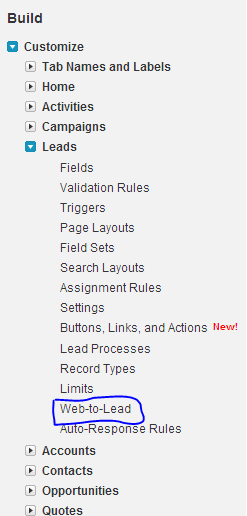
Logininto your Salesforce account.- Go to the following options in the order as given
"set up" -> Customize -> Leads -> click on Web-to-Lead.Here is the screenshot was taken from the website of https://www.salesforcetutorial.com/salesforce-web-to-lead/ to elucidate how it would appear.
Then you will navigate to the following screen.
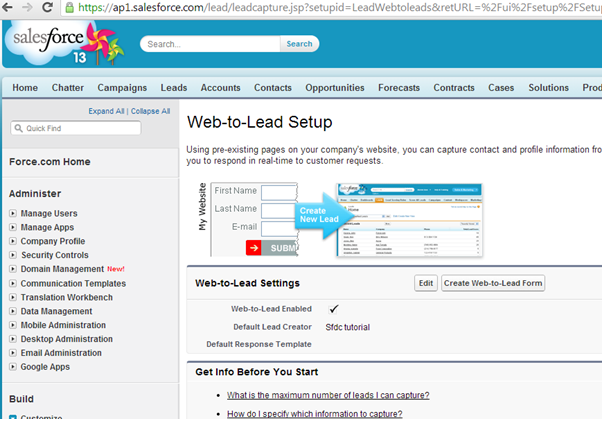
Here we can see web to lead set empowered checkbox is checked. Of course, web to lead is enabled in Salesforce. What’s more, default lead creator is the proprietor of the lead generation in Salesforce. By default, it will show System Administrator who made Salesforce association.
You can alter the proprietor of the default web to lead creator and furthermore you can choose default Response layout by tapping on the "Edit" option.
- Tap on “Create Web-to-Lead Form” option then you will be redirected to the following screen.
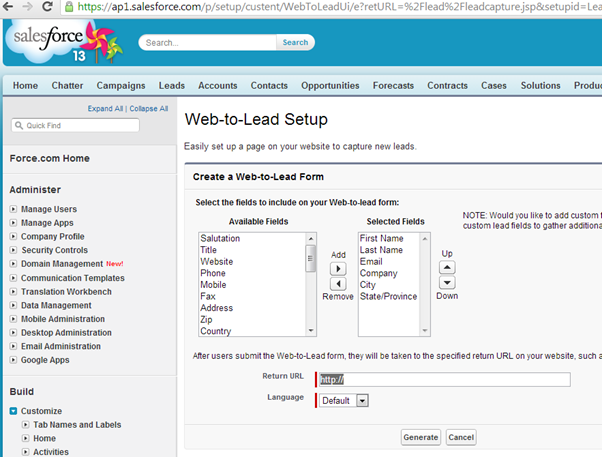
Here you can see the list of fields to show on the web to lead form including custom fields from Lead object. You can include or expel fields by utilizing "add" and "remove" tabs. And furthermore, you can reorder fields by utilizing "up" and "down" tabs.
Also in the above screen Return URL and Language are obligatory fields that you have to make reference to.
- Essentially
"Return URL"is after the lead form is presented this is the URL that the client will be directed to. - Next step is to click on the Generate tab then you will navigate to the following screen as given in the screenshot.
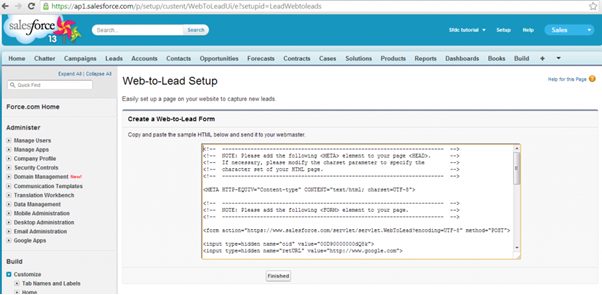
Salesforce creates HTML code and you can insert it directly into your website and you are all set.
A Few Hacks & Tips for using Salesforce Web-to-Lead Forms
Get yourself a form builder: You can make forms utilizing Salesforce but they’re famous for being hard to set up. They’re a task to streamline/redo and none of these attributes are extraordinary from a lead generation perspective. Fortunately, Salesforce Web-to-Lead Forms play pleasantly with various outside developers and lead generation instruments that you can do to ease out this task.
Create a Salesforce campaign for every form on your site: If you want to know how effective your promoting procedure is at controlling clients over the business pipelines you make, you first need to how you originally produced each lead. Of course, Salesforce Web-to-Lead form just catch the name and essential socioeconomics of individuals who join.. You should simply make a different campaign for each form on your site. You can do this by including the Campaign ID and Campaign Member Status on your forms and you are all sorted after that.
See the path to conversion users take by capturing URL parameters: URL parameters with hidden fields on your forms reveal to you on which page leads are on when they convert (especially vital when you have a similar frame on various pages). However, you can likewise utilize this procedure to delineate the voyage they took before converting over. Before you can do this you’ll have to add these parameters to your URLs. For instance, you’ll add something like mailcamp=# to the URLs for traffic that originates from your email campaigns.
Put a stop to spam: Preventing spam from web forms is a genuine test for each site owner yet this is particularly baffling with regards to client and lead management. Spam causes a wide range of havoc with your information and putting a stop to it is indispensable. With Salesforce Web-to-Lead Forms you can add a CAPTCHA to counteract spam.
Put a stop to duplications: A typical issue with analytics and CRM platforms is duplication. Shockingly, Salesforce doesn’t have a worked in the framework for managing duplication so you’ll have to approach some progressive outsider combination for this. You’ll discover a lot of alternatives accessible through the Salesforce AppExchange page, including CRM fusion, Ring Lead and a lot of others. Obviously, this implies joining with these outsider apparatuses too, so you’ll have to think about what else every one of these devices brings to the table and whether they have a place in your advertising toolbox.
Conclusion
I hope this blog has given you clarity on Salesforce Web-to-Lead form creation and the best ways to use this tool effectively. For advanced configurations or tailored assistance, connecting with an experienced Salesforce consultant can help you optimize your setup and results.
Ready to accelerate your Salesforce journey?
Talk to a JanBask specialist and get a strategy session tailored to your business.